
Implementing a native OIDC flow directly on Google Cloud without using an external Identity Provider - Part 1
JWT-powered stateless auth bridges public and private services. User sessions persist via token handoff, eliminating server-side storage.

 - Lorenzo Lippi as art print or hand painted oil.")
The Problem
Imagine you're building a web application that consists of multiple microservices running on different Cloud Run instances.
You need to ensure that only authenticated users can access certain services. Traditional session-based authentication methods are not suitable for distributed systems. Because, session data is not shared: Cloud Run instances are stateless and don't share session data by default.
Moreover, you need to handle token expiration gracefully and mitigate the risk of a single point of failure (If the secret key is compromised, the entire system is at risk).
You do NOT want to create special credentials for the application but want to leverage existing credentials from your existing accounts (Google, Facebook, etc.) to grant permissions to your services - Google or Facebook will manage access and grant permissions.
The Solution
The in-depth solution
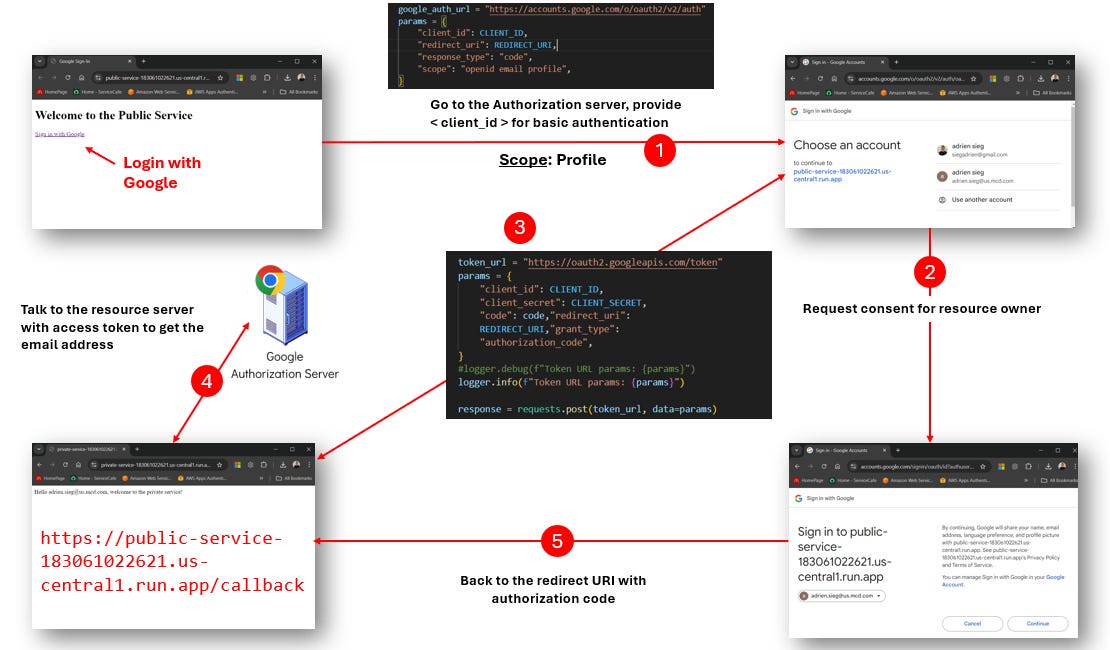
Step 1: User Initiates Login
User visits the public service and clicks a "Login" button.
https://public-service-183061022621.us-central1.run.app/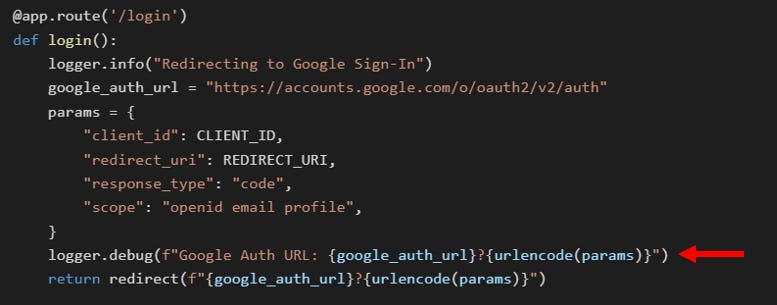
Public service redirects to Google's OAuth 2.0 authorization endpoint.

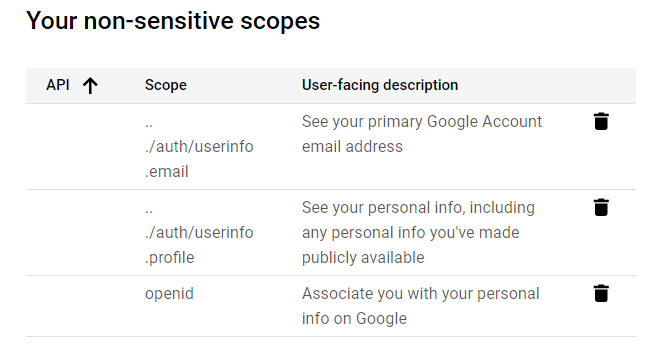
https://accounts.google.com/o/oauth2/v2/auth?client_id=183061022621-oiivmgvihfrnr14068aunhurmvkm5pcq.apps.googleusercontent.com&redirect_uri=https%3A%2F%2Fpublic-service-183061022621.us-central1.run.app%2Fcallback&response_type=code&scope=openid+email+profile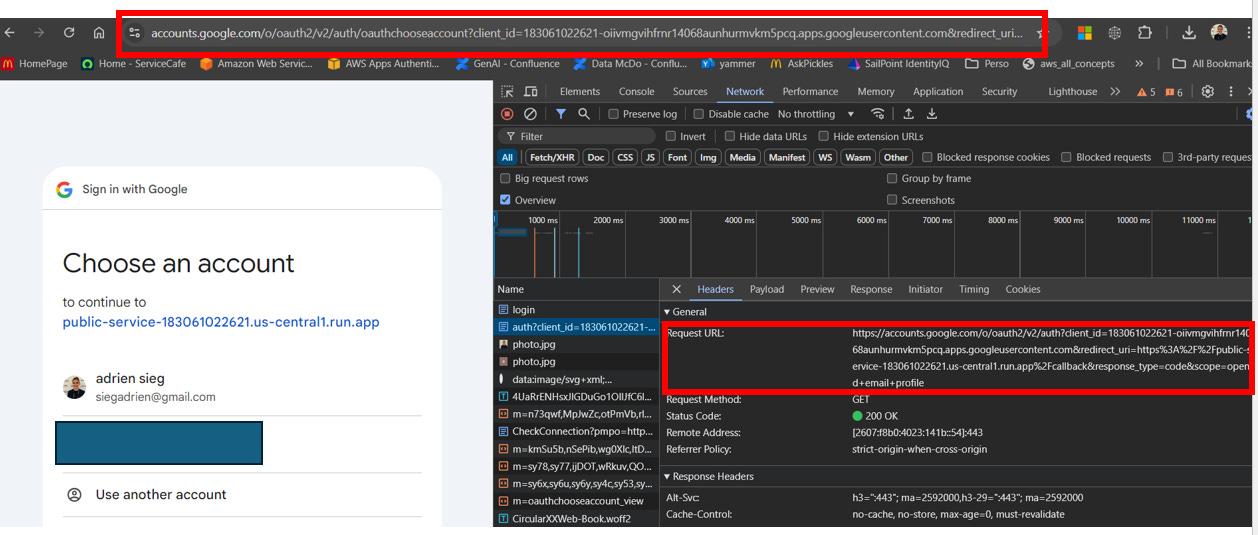
Step 2: Google Authentication
User logs in with their Google account and grants permissions.
Google redirects back to the public service's callback URL with an authorization code.
Step 3: Token Exchange
A callback, in the context of OAuth 2.0, is a route in our application that receives the response from the authentication server (in this case, Google) after a user has authenticated. It's called a "callback" because it's the URL we've told Google to "call back" to after authentication is complete.
This callback function handles the response from Google after the user has authenticated, exchanges the temporary authorization code for more permanent tokens, and retrieves the user's information.
Instead of using the ID token directly (which would be the case in a full OIDC implementation), we send it to Google's tokeninfo endpoint to retrieve user information.
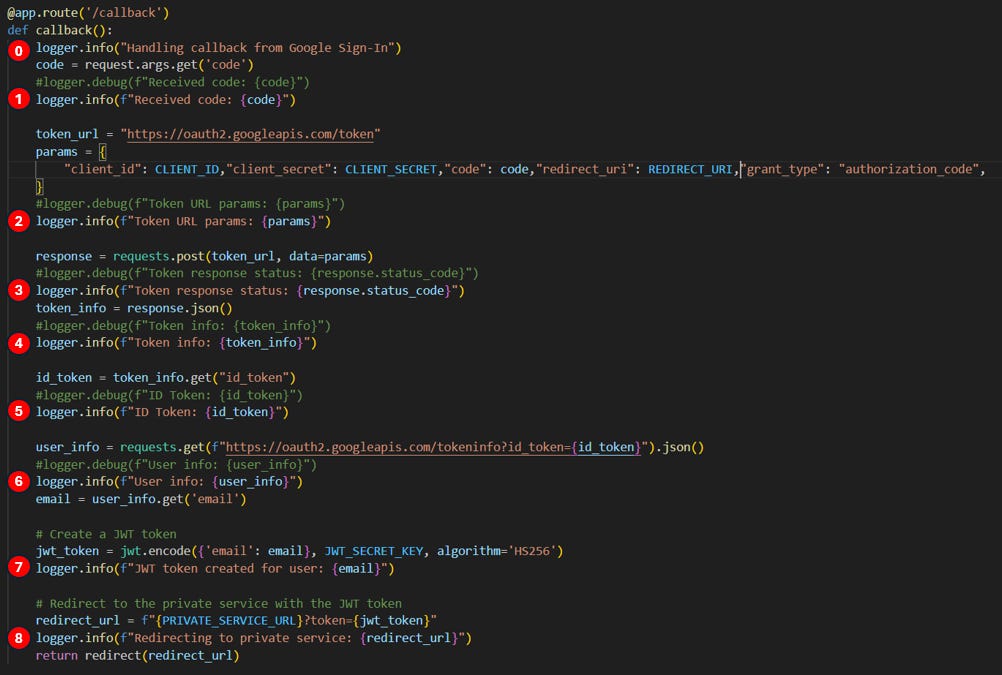
When Google redirects back to your application, it includes an authorization code as a query parameter. This line retrieves that code.
code = request.args.get('code')In our example (step 1):
Received code: 4/0AVG7fiTakdN68U8qbY9Xk3ymHep_eyVVN0qAmjR5ydDD6AhYIiMUQGqiYt88cx6cNHHAGwPreparing to exchange the Code for Tokens - (Below - sets up the parameters needed to exchange the authorization code for access and ID tokens).
token_url = "https://oauth2.googleapis.com/token"
params = {
     "client_id": CLIENT_ID,
     "client_secret": CLIENT_SECRET,
     "code": code,
     "redirect_uri": REDIRECT_URI,
     "grant_type": "authorization_code", }
In our example (step 2):
Token URL params: {
   'client_id': '183061022621-oiivmgvihfrnr14068aunhurmvkm5pcq.apps.googleusercontent.com',
   'client_secret': 'GOCSxxxxxxxxxxxxxxxxxxxxxxxxxJQD',
   'code': '4/0AVG7fiTakdN68U8qbY9Xk3ymHep_eyVVN0qAmjR5ydDD6AhYIiMUQGqiYt88cx6cNHHAGw',
   'redirect_uri': 'https://public-service-183061022621.us-central1.run.app/callback',
   'grant_type': 'authorization_code'}
Exchanging the Code for Tokens - This (below) sends a POST request to Google's token endpoint to exchange the authorization code for tokens. The response includes access_token, refresh_token, and id_token.
response = requests.post(token_url, data=params) token_info = response.json()In our example (step 3):
Token response status: 200Extracting the ID Token - The ID token is extracted from the token information received from Google.
id_token = token_info.get("id_token")In our example (step 4):
Token info: {
   'access_token': 'ya29.a0AcM612x2_W2 (...) KVQ0170',
   'expires_in': 3599,
   'scope':
         'https://www.googleapis.com/auth/userinfo.profile
          openid
          https://www.googleapis.com/auth/userinfo.email',
   'token_type': 'Bearer',
   'id_token': 'eyJhbGci (...) 97HBGfqkIX65F_Xttg'}
and in our example (step 5):
ID Token: 'eyJhbGci (...) 97HBGfqkIX65F_Xttg'Under GCP > OAuth consent screen > Credentials
Verifying the ID Token and Getting User Info - Instead of decoding the ID token directly, this code sends it to Google's tokeninfo endpoint to verify it and get user information.
user_info = requests.get(f"https://oauth2.googleapis.com/tokeninfo?id_token={id_token}").json()in our example (step 6):
User info: {
    'iss': 'https://accounts.google.com',
    'azp': '183061022621-oiivmgvihfrnr14068aunhurmvkm5pcq.apps.googleusercontent.com',
    'aud': '183061022621-oiivmgvihfrnr14068aunhurmvkm5pcq.apps.googleusercontent.com',
    'sub': '104216528895493057512',
    'email': 'siegadrien@gmail.com',
    'email_verified': 'true',
    'at_hash': 'Dca2xSEMxErBRlgzZ7dIdg',
    'name': 'adrien sieg',
    'picture': 'https://lh3.googleusercontent.com/a/ACg8ocKFcPCtvrPYd_2XPJxlgStf8sBTyO3fNqjcrg-FsFWPph9UXiW_=s96-c',
    'given_name': 'adrien',
    'family_name': 'sieg',
    'iat': '1728858692',
    'exp': '1728862292',
    'alg': 'RS256',
    'kid': 'a50f6e70ef4b548a5fd9142eecd1fb8f54dce9ee',
    'typ': 'JWT'
}
Extracting the User's Email:
email = user_info.get('email')Summary of Step 3:
Receive the authorization code from Google
Exchange this code for tokens
Use the ID token to get user information
Extract the needed user data (in this case, the email)
Step 4: JWT Creation
After this, our application typically creates a session for the user by creating a JWT to maintain the user's authenticated state.
Public service extracts the user's email from the Google ID token.
Public service creates a JWT token containing the user's email, signed with
JWT_SECRET_KEY.
jwt_token = jwt.encode(
    {'email': email},
    JWT_SECRET_KEY,
    algorithm='HS256')

logger.info(f"JWT token created for user: {email}")
in our example (step 7):
JWT token created for user: siegadrien@gmail.comStep 5: Redirect to Private Service
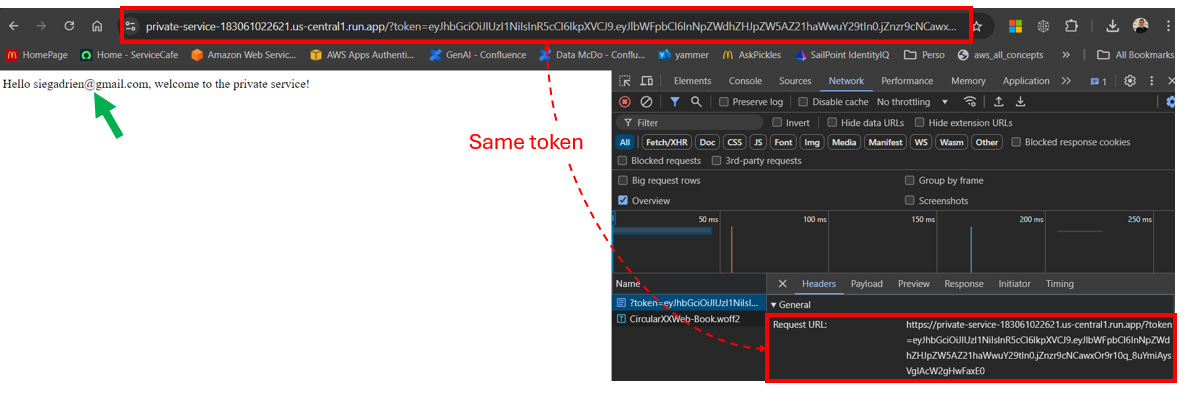
Public service redirects the user to the private service URL, including the JWT token as a query parameter.

in our example (step 8):
Redirecting to private service: https://private-service-183061022621.us-central1.run.app?token='eyJhbGci (...) 97HBGfqkIX65F_Xttg'Step 6: Private Service Authentication
Private service receives the request with the JWT token.
Private service verifies the JWT token using the same
JWT_SECRET_KEY.
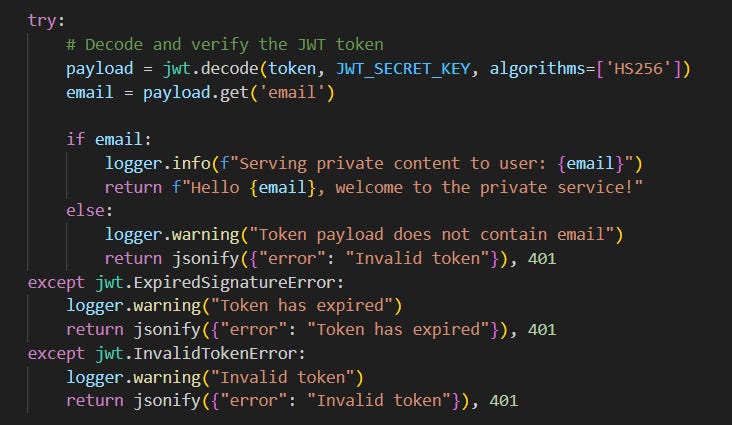
If the token is valid, the private service extracts the user's email from the token.
This is the token 'eyJhbGci (...) 97HBGfqkIX65F_Xttg'
Step 7: Access Granted
If the JWT is valid and contains an email, the private service allows access.
Private service can now use the email to personalize the response or perform further authorization checks.
Example of JWT Token:
eyJhbGciOiJIUzI1NiIsInR5cCI6IkpXVCJ9.eyJlbWFpbCI6InNpZWdhZHJpZW5AZ21haWwuY29tIn0.jZnzr9cNCawxOr9r10q_8uYmiAysVglAcW2gHwFaxE0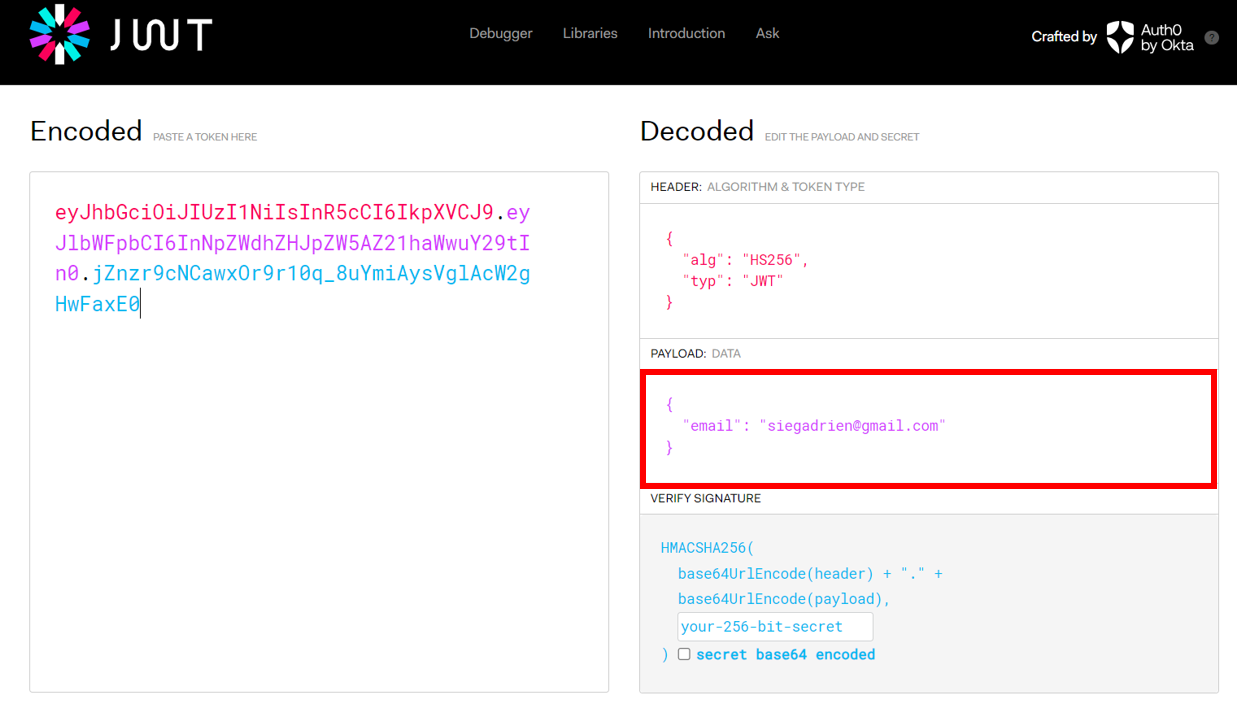
What’s the difference between an (authorization) code 🆚 an access_token?
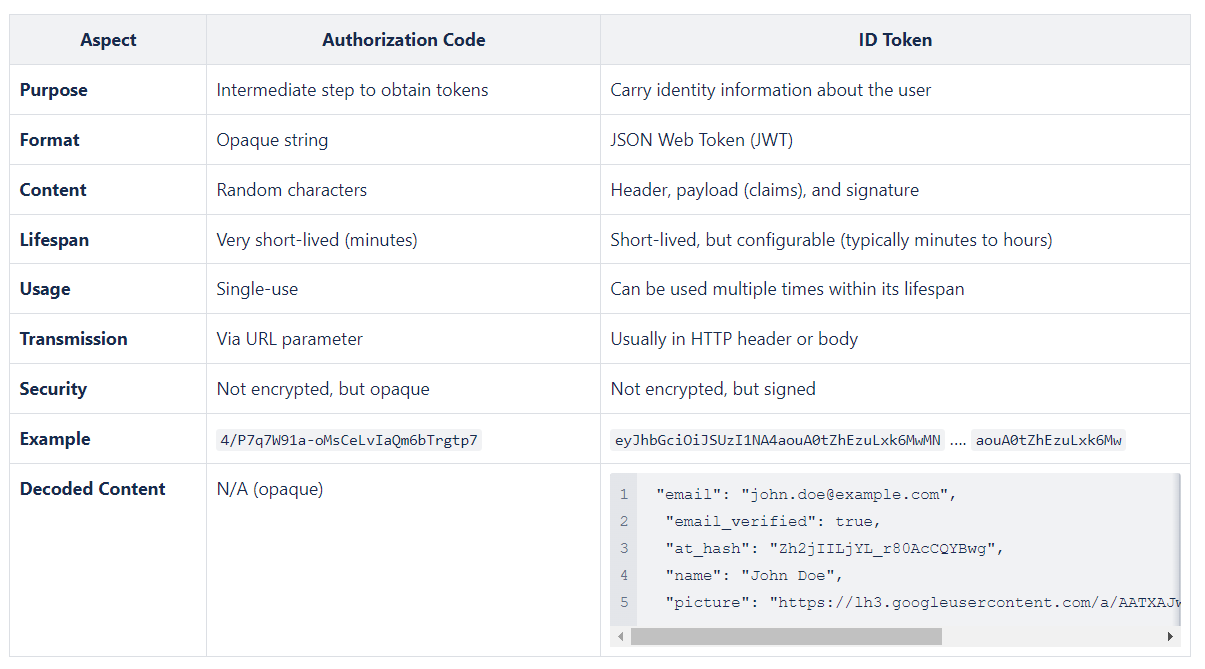
By using an authorization code, the actual tokens (ID token, access token) are not exposed in the browser's URL or in the client-side code. This reduces the risk of token interception by malicious actors.
Front-channel 🆚 Back-channel: The authorization code is transmitted through the front channel (browser), while the exchange for tokens happens in the back channel (server-to-server communication).
Protecting Sensitive Information: By using an authorization code, sensitive tokens (like ID tokens) are never exposed to the potentially less secure front channel.
Next articles and challenges
👉 How to maintain the user's session state across multiple requests?
👉 How can we improve security by replacing JWT in URL parameters with a more secure method like HTTP-only cookies or Authorization headers?
👉 How can we manage 1,000 microservices, decouple them, centralize traffic management, avoid duplicated authentication logic, and gain better flexibility and monitoring across microservices?
👉 Why OAuth is NOT an Authorization protocol?